Showing posts with label projects. Show all posts

30 June 2016

DATABASE OF YOUR FONTS


FONT IDENTIFIER

Ever wondered what it would be like to have an overview all your fonts?

I have over 1500 fonts installed on my Mac and land up only using the ones that I know, as I just don't have the time to scroll through and test all 1500 of them every time I create a new project.

Now, as we are creatives that means we are visual, well, I certainly am and I like to see what the chosen font will look actually like and not have to type a word or sentence for each and every font that I think I might like for my project.  Luckily for me and you, Print my Fonts by Stefan Trost Media has created a software program which does just that for us and best of all, it is for FREE.  You can of course make a donation, which would greatly assist them, for future programs.

It's easy to install, if you wish to do so or you can just utilise the tool as is. Download the program, install the software, which is compatible for both Mac & PC, and open it.  It will look like this image below.  You can then check which boxes you would like printed.  I chose these.  "The quick brown fox jumps over the lazy dog", if you did not know, it uses all the letters of the alphabet, therefore you are able to see how each letter will look for your desired font.

Font identifier, font software program, font library
Install Print My Font Tool

I decided to not print all 108 pages but rather save all 108 pages as a PDF as I am constantly adding new fonts and would then waste a lot of paper reprinting the list each time.  I saved it as a PDF which you can do by sending it to the printer, however, it has a box that gives you an option to save it as a PDF rather than selecting the Print option.

font, font identifier, font tool
Print My Font Print or Save Option


The great thing about saving it as a PDF is that it has a search button.  Start typing in a font name and it will highlight the one you're looking for or alternatively you can now scroll through the list and SEE which font you want as it is now already displayed in it's style. This is an easier and quicker way to overview your fonts in a list form and is now on-hand for all your future creative projects.

Font Identifier, font library, fonts
Print My Font Database

Or you can rather type in the text directly with the Print My Font Tool to view in a specific font within your font library, as seen below, instead of saving or printing the list.

Font, fonts, tool, font identifier, font overview
Stefan Trost Media- Print My Font Tool

Inclusive of this one, there are many other features to explore, read more here.

PrintMyFont, font, fonts, font library
Print My Font Features


Share this post on any or all of your social media platforms and help fellow creative entrepreneurs discover this amazing tool.

Wishing you a very creative week


23 June 2016

COMMUNITY BOARD ON PINTEREST


The Art of Creativity Studio Community Pinterest Board

The Art of Creativity Studio Community Pinterest Board

At The Art of Creativity Studio we have opened a Community Pinterest Board.  We welcome Creative Contributors to Pin your Handmade Arts and Crafts from your Website, Blog or Online Shop. We encourage you to share industry-specific tips, training materials and resources.  The Pins must only relate to HANDMADE Arts and Crafts, otherwise you will be removed.

You can sign-up via our Pinned Facebook Page Post by first following The Art of Creativity Studio's Pinterest and Liking our Facebook Page, we will do the same.  In the comments section on our Facebook Page, please add your Pinterest Profile and you will be added as a Creative Contributor.  After that you will receive a request from us to join as a Contributor on our Community Pinterest Board. You will need to accept this request to add Pins. This Board will then show up on your Pinterest profile.

Please note that we will not add you as a Creative Contributor if your profile does not meet the above requirements and you will be removed if you do not comply with the above requirements. Once you have been accepted as a Creative Contributor you will be able to add other Creative Contributors in the same way.  You may use this Blog Post in your posts to share how to grow our Handmade Community.

This Community Board has been created so that we, as Creatives, can share and learn from each other by adding Pins that add value to our Creative process.  Remember to also share your work, your products and other pins that you think we would all benefit from.

We are looking forward to growing our Creative Community on OUR Community Board.

Happy sharing ;-)

16 June 2016

CELEBRATE FATHER'S DAY 2016


FREE PRINTABLE FATHER'S DAY COUPONS AND CARDS


"I cannot think of
Any need in
Childhood as
STRONG
as the need for a
Father's protection" 
- Sigmund Freud  


Do you need a little bit of Inspiration as to what to give your Dad on Father's Day? The Art of Creativity Studio has created this Free Printable Father's Day Kit for you to Download.

Mom's you will have to help your kiddies to download these and print them, but they can help to decorate and put them together.

Print the coupons/vouchers on construction paper,  the front and back (blank coupons) of the booklet on card stock (see extra bonus downloads), cut them out and staple them all together.  Take a photo of each of the kiddies so that they can each give Dad their own coupon booklet with their photo stuck on the front cover.  They can write in their names using markers and decorate the booklet with craft supplies.

Father's Day Coupons
Dear Daddy, I Promise to ...
Father's Day Coupons
Blank Father's Day Coupons

Other suggestions for coupons can be: Free car wash, games night, staying up late, bedtime story, etc.

Adult "Kids" to older Father: Family lunch/Dinner prepared by them, A Weekend away paid by them,  or what about a Wine/Beer Tasting event.

And for you Mom, I have created "A few coupons from Me to You for being such a great Dad to our Kids," for you to download.

Wife to Husband Coupons

Free Downloadable Father's Day Cards created at The Art of Creativity Studio:

Father's Day Card
Dad Card

Father's Day Card
#1 Dad in the World


All of the above Free Printable Father's Day Projects and EXTRA Bonus Printables can be downloaded here.  Please note that they are for Personal-Use Only.


OTHER FATHER'S DAY LINKS: 


Share what are you doing for Dad on Father's Day in the comments box

12 May 2016

NO PHOTOSHOP? NO PROBLEM!

PICMONKEY IS YOUR #1 OPTION


"PicMonkey is a free online photo editor and collage maker. Basic editing all the way up to advanced stuff." It is so easy to use and before you know it, you too, will start to create your very own designs for any project. 

PicMonkey
PicMonkey

I decided that my Facebook Page needed an update and I used PicMonkey's Collage Maker to help me create a fab new FB page.

Collage Layout

I'll show you just how easy it is. I chose the Collage Maker Option, then selected the Facebook Canvas for my Design.

Canvas Designs

It is best not to change the presets (which you can easily do, but why re-invent the wheel)


Open a photo or photos from your Computer, Facebook, OneDrive or Dropbox and then drag them into the cells (boxes) as you'd like them to appear.


In addition, you can create cards, your own designs, or any other collage by utilising their free templates provided. The backgrounds can be coloured (you can also use the dropper and use one of the colours from your image), rounded and spaced, just as you like. 


Once you have completed the layout, it is best to save your design at this point. It is preferable to save it as a PNG. The Quality of the image will be recommended, but that can also be changed. No time to complete the Edit? No problem! When you are ready to complete the project, just open it from where you saved it and continue the Edit from the Design Option in the first image.

The Art of Creativity Studio

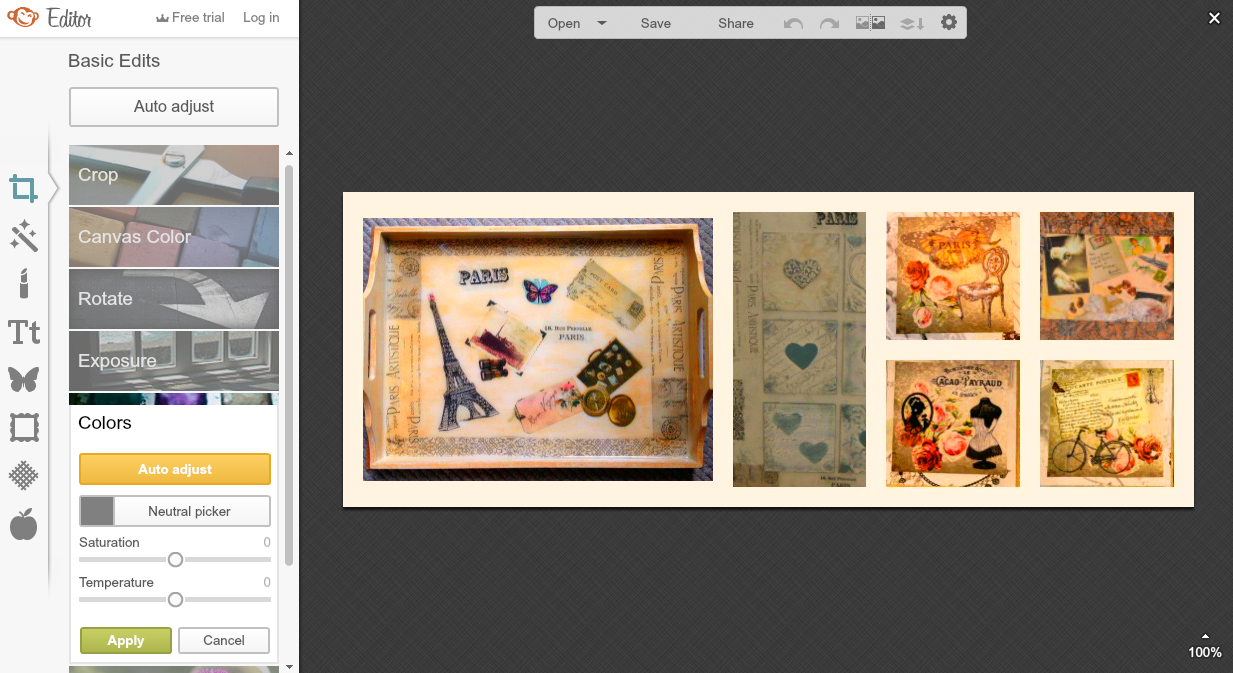
Once on the Basic Edits the possibilities are endless. Crop, Canvas Colour, Rotate, Exposure, Colours, Sharpen and Resize are just the start of the Edits. This is what happened when I changed the Saturation and Temperature in Exposure, from the above image to the below image. You will be promoted to Apply the changes as you go along or if you are not happy you can cancel or undo.  Just a note: You cannot undo the Edits once you have saved your design, so I would suggest that you rather save it a few times, with a new Filename, during your design process than to have to begin the whole design from scratch.  That way you can pick up where you left off when you were happy with the design at that point. 

The Art of Creativity Studio

There are TONS of Special Effects, which means that for each project, you can have a completely new image.  Play around with the different options from the "Tried & Tested", Basic, B&W, Camera Look, Paintbox, Light Area, Artsy to Advanced and be amazed. If the Freebies aren't enough for you already, then sign-up for the Royale Package and receive even more choices!

The Art of Creativity Studio

But wait! There is more.... You can add Text to your image using their fonts or you can add Your Own Text using Yours. These can be resized, centred, colorised, blended, etc. Here are some Font & Graphic Websites that I use: Font BundlesCreative MarketGraphic StockThe Hungry JPEGCreative BoosterDeezy, to name but a few.

The Art of Creativity Studio

Oh boy! And the Overlays are just AMAZING! These too can be resized, centred, colorised, blended, etc. or use the Eraser Tool to remove the bits you don't want. Note, that any of these options can be clicked on and deleted before you apply changes and save. 

The Art of Creativity Studio

Add PicMonkey's Textures or Your Own from the Websites, I suggested above.

The Art of Creativity Studio


Then, if you still want more options, choose the Themes. Last but not least, your Masterpiece needs a Frame to complete the Design, if you so choose. 

The Art of Creativity Studio

The Design is now complete and my Facebook Page has a new Cover. 


6 April 2016

MY CREATIVE JOURNEY (Part I)

MY STORY

I absolutely love to create and make things and I will try anything creative once.
It has been a journey of many creative experiences to get me to where I am today.


I took great pleasure from a very young age in keeping myself entertained with my colouring book and crayons and I still have my first colouring-in book, which my Mom had kept for me.  I could spend hours "teaching" my dolls and sometimes my sisters would oblige.  Little did I know that years later, I would actually become a Nursery School Teacher or an Artist.

My Nanna taught me to knit, crochet, embroider and sew when I was 8 and I started sewing on her old Singer Machine with the treadle. She had so much patience and I was the only grand-daughter who was interested.  Neither my Mom, nor my 2 sisters were remotely interested in needlework. 

I also loved to write and had several Penpals in my teenage years and delighted in stamp collecting, which was the in-thing, back in the early 80's.


I had really wanted to become a teacher when I left school, but unfortunately, I was not able to attend Teacher College after I Matriculated.  I went to study "Secretary of Tourism" of all things at the Cape Technicon.  I went on to work for the South African Tourism Board for a few years.  During this time I met my future husband on a blind date and on the 6th of April 2016, we celebrated our 25th Wedding Anniversary.

With my husband, being a pilot, we have moved several times, wherever the work has taken us.  When we were newly married, I attended Mixed Media evening classes in Pretoria, South Africa after work.  In our classes we created some of these:

Bunny Jewellery Holder for Daughter's Room

Checker Sheep Board for Nursery Room


I then started lessons at Sew & Simple in Johannesburg, South Africa and created many of my own clothes and my husbands tracksuits, absolutely hideous when you look back.... I was still yearning to become a teacher and decided that the only way I was going to do that was to study long-distance.  I enrolled and within 2 years of intense studying, I qualified as a Nursery School Teacher. My dream to teach did not materialise as in 1993, I fell pregnant with my son and wanted to be a full-time Mom.

My Son was 2 when we moved back to the Cape where I assisted a friend in her home industry business, which is now a very big supplier of school uniforms in the Western Cape and she now has her own factory. It was then that I realised that there was a market for Maternity Wear as the maternity clothing were just awful and had no shape to them whatsoever.  I went to night school and learnt pattern making and started my own little home industry, manufacturing Maternity Wear, called Mum2Be, which grew successfully.

I was able to continue with Mum2Be during several moves, and even when my daughter was born in 1999. Unfortunately, I was not able to move my business with me when we relocated to Mauritius in 2000 as I was not allowed to work there as my husband was the one with the work visa. However, saying that we were allowed to do Charity Work and Volunteer, so I volunteered at the Children’s school at the School Shop, where I learnt Pastel Accounting and attend the Corona Women's Group where I made many friends.  Expat life there was fantastic.

Halloween

Under The Sea Theme
Nursery Rhymes
Spirngtime at Nursery School
In 2005 we relocated, again, this time to Abu Dhabi.  This is where, I finally had the opportunity for my passion, which was to Teach.  I loved teaching and was able to teach as a Nursery School Teacher for 5 years.  Arts and Crafts was obviously my favourite teaching aspect and I looked forward to planning those lessons the most. The best was teaching kiddies how to paint, hold a pencil, cut with a scissors and watching them grow into very independent children who could write, build puzzles, throw a ball, climb the jungle gym, etc. 


Part II to follow next week on 13/4/16


12 August 2015

WONDERFUL WASHI TAPE

Washi 和紙  is derived from "wa" meaning Japanese and 'shi" meaning paper. Washi (Paper) is an old tradition in Japan of producing uniquely specialised papers obtained from wood-pulp from the mitsumata shrub, gampi tree or mulberry bark. Washi Tape is, however, typically made using the natural fibres from bamboo, rice, wheat and hemp. 

Not only will your projects (scrapbooking, gift-wrapping, card-making, decorations, ornaments, etc.) be transformed to the next level of awesomeness, this delicate tape can be utilised in everyday items as well. You can give your home, work and personal items a unique feel with your own supply of Washi tapes.  This versatile craft tape is acid-free, slightly transparent and has an array of designs, patterns and colours to choose from, which can be written on, torn, removed and re-positioned (not as sticky as traditional sellotape). You will find that Washi tape will become your next must have stock item in your craft room whatever type of creative you are.


My supply of Washi Tape all mixed-up in this basket to them being organised in this foil/aluminum recycled box.


Washi Tape transformed a very plain glass candle holder to a very pretty glass candle holder.


An orchid in a glass vase was easily made more attractive with Washi Tape.


This boring tin was up-cycled and given a new lease on life with Washi Tape.


Are your stationery supplies looking drab? Make them look fab with....you guessed it...Washi Tape.


Washi Tape your Scrapbook pages to give them a fun element.


Frame Washi Tape on your walls and cupboards.  Washi Tape now also comes as Blackboard Tape which can written with a Chalkboard Pen.


The possibilities are endless, but just incase you need more inspirational Washi Tape ideas: https://www.pinterest.com/Creativity2Art/creativity/

27 May 2015

SO NOW I HAVE A RYOBI MINI TOOL

RYOBI MINI TOOL


I purchased my very own Ryobi Mini Tool, similar to the Dremel Mini Tool and I can't wait to start using it.


If you are a keen crafter, as I am and maybe a bit of a perfectionist, then this tool will help you create beautiful projects. I won't have to stand for hours with sandpaper sanding away rough edges. Now, I'll just be able to whip out my Ryobi Mini Tool and in no time, I'll have that perfectly sanded smooth edge.  I'll be able to engrave, grind, cut and polish glass, stones, wood, metal, etc. 

The Ryobi Mini Tool will allow me complete versatility as it has a flexible shaft which is quick and easy to assemble and all the accessories fit it. 

The Ryobi Mini Tool's speed is adjustable from 0-30'000 r/min depending on the required speed for the material and accessory being used.

The Kit comes with 40 pieces of accessories in a carry case as seen above, weighing in under 1 kg.

  • Don't forget about wearing safety glasses, earplugs and a dust mask. Rather safe than sorry!
  • If it makes a grinding noise, check the carbon brushes and replace, if necessary.
  • Let it work for you, don't force it.
  • Don't put your hands over the air vents, needs them to cool down.
  • Wipe it clean with a dry cloth only and keep it free of dust.
  • Use an outdoor extension cord and don't work in the wet or near flammable liquids.
  • Ensure that it is Switched Off before plugging in.
  • Use the correct accessory for the project.
  • Using clamps to secure your work, will free your hands to operate the tool.
  • Be alert and aware of your surroundings.
Below is a complete list of all the accessories available for just about any crafters project. 


Need some inspiration? Pop on over to The Art Of Creativity 2's Creativity Pinterest Page and start that project that you have been waiting to create.